
“Itsy-bitsy spider
Climbed up the waterspout;
Down came the rain
And washed the spider out;
Out came the sun
And dried up all the rain;
And the itsy-bitsy spider
Climbed up the spout again.”
This itsy-bitsy nursery rhyme has stood the test of time across generations, and now it’s time to amp it up a little. With the super crafty supplies at #seasonsville, one of the most feared animals can be made to look cute by making an exciting DIY pom-pom spider with your little ones. We guarantee, kids will love the process and the final product!
MATERIALS NEEDED
All the materials required for such an interesting activity that nurtures children’s creativity are easily available at seasonsville.com. Here’s what you will need to make a DIY pom-pom spider:
- Large black pom-poms (as per the number of spiders to be made)
- Black pipe cleaners (two per spider)
- Scissors
- A string/thread
- White craft glue
- Wiggly eyes
- Scraps of paper/felt/craft foam (preferably red)
APPROXIMATE TIME: 7-10 minutes (per spider)
PROCEDURE
In the following eight simple steps, you can create the cutest version of this creepy-crawly:
Step 1: Set Out the Materials
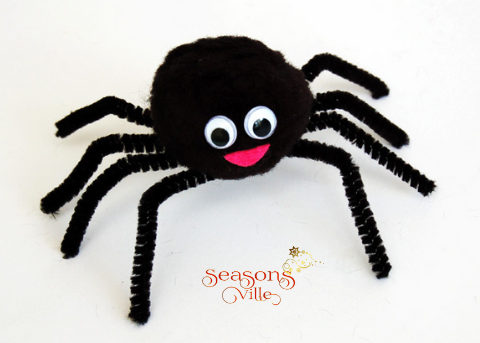
It is always important to ensure you have all supplies before beginning a DIY, even more so when working with children. Lay out an old newspaper on the floor and start with a large black pom-pom and two black pipe cleaners.
Step 2: Prepare the Pipe Cleaner
Use the scissors to cut the pipe cleaners into two halves to get four shorter lengths. These form the spider’s legs. Remember to smooth down all sharp edges and always use tools like scissors and cutters under adult supervision for safety.
Step 3: Tie the Pipe Cleaners Together
Gather the four pieces of the pipe cleaner cut in the previous step. Tie them from the middle in the shape of an asterisk (*) using a string or multiple layers of thread. You may secure it further by gluing them together.
Step 4: Make the Spider’s Legs
Fan the legs out. Make a small dent in each one of them at roughly the same spot.
Step 5: Make the Spider Stand!
Before moving to the next step, ensure that the legs are upright on a flat surface. If one of them is not touching the surface, straighten the pipe cleaner and bend it to a place where it matches the height of the others.
Step 6: Give the Spider a Face
On the pom-pom, creatively stick a few wiggly eyes. Keep in mind, a spider can have as many as eight eyes! For the mouth, cut a piece of red paper/craft foam/felt and firmly stick it on the pom-pom using glue.
Step 7: Compile
Use the glue to stick the pom-pom on the center of the pipe-cleaners (legs) and let it dry for a while.
Step 8: All done!
Your DIY itsy-bitsy spider is ready!
CONCLUSION
Ace the next science project with a realistic spider made from scratch, score bonus credits the next time you compete at poem recitation, add another cute decoration for Halloween or just make a creative corner in your room; the DIY pom-pom spider is always a great activity to indulge in!